Preparing Your Concrete Floor for Staining
Assessing the Concrete Surface – Check for cracks, moisture, and existing finishes
Staining a concrete floor transforms a utilitarian surface into a masterpiece of colour and character, but the journey begins with meticulous preparation. Before you embark on how stain concrete floor, it’s vital to assess the integrity of the surface itself. Cracks, moisture intrusion, and existing finishes can undermine the final result, turning your project into a frustrating ordeal rather than an aesthetic triumph.
Begin with a thorough inspection—examine the concrete for any visible cracks, which should be repaired to prevent them from widening once stained. Moisture levels are equally critical; excess moisture can cause uneven staining, so testing for dampness using a moisture meter is prudent. Additionally, note any remnants of previous coatings or sealers, as these can hinder the dye’s absorption and affect durability. For a flawless finish, ensure the surface is clean, dry, and free of debris, setting the stage for a seamless application of stain that captures the depth and vibrancy you desire.
Cleaning and Etching – Proper methods to clean and prepare the surface
Before diving into the artful process of how stain concrete floor, proper cleaning and etching are essential steps that lay the foundation for a stunning transformation. Concrete surfaces, especially those that have endured years of wear, can be filled with hidden grime and residues that hinder the stain’s ability to penetrate evenly. A thorough clean ensures the colour will be rich and vibrant, capturing the depth you seek.
Start with a detailed cleaning routine—sweeping away loose debris and vacuuming dust and dirt. Follow this with a degreasing solution if the surface shows oil stains or grease patches, as these can repel the stain and create uneven results. Once clean, etching the surface with a muriatic acid or a commercial concrete etchant opens up the pores, allowing the stain to absorb deeply and uniformly. For a truly professional finish, consider using an ordered approach:
- Mix the etchant according to instructions and apply evenly across the surface.
- Allow it to sit for the recommended time, then scrub gently with a stiff brush.
- Rinse thoroughly with water and let the floor dry completely before staining.
This meticulous preparation ensures your concrete is primed for the staining process, resulting in a durable, vibrant finish that enhances the character of any space. When you understand how stain concrete floor with such care, the final outcome becomes a true reflection of craftsmanship and attention to detail.
Repairing Damages – Fix cracks, holes, and surface imperfections
Every masterpiece begins with a foundation, and in the realm of stained concrete floors, imperfections can mar the final vision—dents, cracks, and surface flaws that threaten to distort the intended artistry. Repairing these damages is not merely a task but a crucial act of craftsmanship, a way to breathe life into a once-broken surface. When you understand how stain concrete floor, addressing these imperfections becomes a vital step, ensuring the stain seeps evenly, creating a harmonious palette of colour and texture.
Cracks and holes are more than superficial blemishes; they are fissures in the very story your floor wishes to tell. Filling these voids with suitable concrete patch or epoxy filler restores the integrity and prepares the surface for the subsequent layers of colour. For a seamless finish, consider the following approach:
- Clean the damaged area thoroughly, removing loose debris and dust.
- Apply a high-quality concrete repair compound, pressing it firmly into cracks and holes.
- Allow adequate curing time before sanding smooth, ensuring the surface is even and ready to accept the stain.
Once repaired, the surface must be meticulously smoothed and primed. Only then can you confidently proceed, knowing that when you stain concrete floor, the beauty will be uniform, resilient, and rich in character—an enduring testament to your careful preparation and attention to detail.
Choosing the Right Stain Type – Differentiate between acid stains and water-based stains
Choosing the right stain for your concrete masterpiece transforms a plain surface into an artistic tableau. When considering how stain concrete floor, understanding the nuances between stain types is essential. Acid stains, renowned for their timeless, mottled appearance, react chemically with the concrete, creating rich, variegated hues that resemble natural stone. These stains are ideal if you desire a deep, enduring colour palette with a slightly translucent quality.
On the other hand, water-based stains offer a versatile, vibrant alternative. They seep into the concrete without altering its chemical composition, allowing for a broader spectrum of colours and easier application. Water-based stains dry quickly and are less odouriferous, making them suitable for indoor projects or spaces requiring swift turnaround times.
When contemplating how stain concrete floor, consider the desired aesthetic and the environment. For a rustic, antique look, acid stains often steal the show, while water-based stains lend themselves to bright, contemporary finishes. Ultimately, selecting the appropriate stain type is a crucial step in your journey towards a stunning, personalised concrete floor that tells a story of craftsmanship and colour.
Selecting the Appropriate Concrete Stain
Types of Concrete Stains – Acid-based vs. water-based stains
Selecting the right concrete stain is like choosing the perfect pair of shoes—get it right, and your floor will be the talk of the town; get it wrong, and it’s a tripping hazard. When considering how stain concrete floor, two main contenders stand out: acid-based stains and water-based stains. Acid stains, with their chemical prowess, create a rich, variegated finish that mimics natural stone — perfect for those who crave a sophisticated, mottled look. Conversely, water-based stains are the versatile, user-friendly siblings; they offer a broad palette of colours and are easier to apply, making them ideal for DIY enthusiasts or anyone seeking a vibrant, uniform hue.
For those who want a touch of artistry, acid stains provide a unique, antique patina that’s hard to replicate, while water-based options allow for more control over colour intensity and consistency. The choice hinges on your desired aesthetic and ease of application. When pondering how stain concrete floor, remember: your decision should reflect both style preferences and practical considerations, such as environmental impact and surface compatibility.
Color Options and Effects – Solid colors, translucent effects, custom blends
Choosing the perfect colour for your stained concrete floor is a bit like selecting a signature scent—you want it to leave a lasting impression. When considering how stain concrete floor, the options range from solid, bold hues to translucent effects that reveal the natural texture beneath. Solid colours can provide a sleek, uniform look that acts as a visual anchor—think deep navy or rich terracotta. On the other hand, translucent stains work more like a whisper, adding a subtle glaze that enhances the surface’s inherent character without overpowering it.
If you’re feeling adventurous, custom blends can turn your concrete into a veritable masterpiece. Combining different stains allows for a personalised palette, creating a floor that’s truly one of a kind. Here’s a quick list to ponder when selecting your stain colour options:
- Bold, solid shades for dramatic impact
- Translucent effects to accentuate texture
- Custom blends for a personalised aesthetic
Remember, the key to mastering how stain concrete floor is understanding the visual effects you desire—whether it’s a subtle sheen or a vibrant, eye-catching statement. The right colour choice can elevate your space from mundane to magnificent, all while showcasing the artistry behind concrete staining.
Durability and Longevity – Factors influencing stain lifespan
When it comes to transforming concrete into a stunning feature, understanding how stain concrete floor durability and longevity are intertwined with your choices is crucial. Concrete stains are not magic potions that last forever; their lifespan depends on a cocktail of factors, from traffic levels to environmental conditions. Interestingly, a well-stained floor can remain vibrant for years, but neglect or poor maintenance can turn that beauty into a faded memory faster than you can say “pothole.”
Factors influencing stain lifespan include the quality of the stain used, the preparation process, and the surface’s intended use. For high-traffic areas, consider stains with a tougher finish—sometimes, a sealant is your best friend. If you’re pondering how stain concrete floor, remember that choosing a stain designed for durability can make all the difference. Here’s a quick rundown of elements that impact longevity:
- The type of stain—acid stains tend to age gracefully, developing a patina that adds character, while water-based stains might need more frequent touch-ups.
- Surface preparation—clean, etched, and properly sealed concrete resists wear and tear better.
- Environmental exposure—UV rays, moisture, and chemicals can degrade the stain faster than a bad joke.
Ultimately, the lifespan of your stained concrete floor hinges on these decisions, making it worth investing time in selecting the right stain type and proper finishing techniques. When you understand how stain concrete floor, you’re one step closer to a durable, eye-catching masterpiece that stands the test of time—and traffic.
Environmental and Safety Considerations – Opting for eco-friendly and low-VOC products
In a world increasingly conscious of environmental impact, selecting the right concrete stain is not merely a matter of aesthetics but a conscientious choice for sustainability. When pondering how stain concrete floor, it’s vital to consider eco-friendly options that minimise harmful emissions. Low-VOC (volatile organic compounds) products shine brightly in this regard, offering vibrant, durable finishes without compromising air quality or health.
Opting for environmentally responsible stains ensures your project aligns with green building standards and reduces your ecological footprint. These products often come with certifications that guarantee eco-friendliness, making them a wise investment for both residential and commercial spaces. Moreover, low-VOC stains are less likely to emit odours during application—an often-overlooked benefit that can make the process more pleasant for everyone involved.
Environmental safety extends beyond the application. When you choose eco-conscious stains, you’re also safeguarding indoor air quality, which is paramount in enclosed environments. As you navigate the intricate process of how stain concrete floor, embracing sustainable products transforms a routine task into a mindful act of stewardship. Ultimately, it’s about balancing beauty with responsibility—crafting surfaces that endure not just in appearance but in harmony with the world around us.
Step-by-Step Process to Stain a Concrete Floor
Gathering Supplies and Equipment – Necessary tools, protective gear, and materials
Staining a concrete floor isn’t just about applying colour; it’s an art that transforms a plain surface into a stunning focal point. To achieve a flawless finish, gathering the right supplies and equipment is crucial. Without the proper tools, even the most skilled craftsmen can fall short of their vision. This is where meticulous preparation begins, ensuring the stain adheres evenly and lasts for years to come.
Essential tools include a high-quality sprayer or brush, concrete etcher, protective gear such as gloves and respirators, and cleaning supplies. Safety should never be compromised—always wear a respirator when working with acid stains and gloves to protect your skin. For best results, ensure your workspace is well-ventilated to prevent inhalation of fumes. Having everything ready before starting expedites the process and minimises errors. Once armed with your supplies, you’ll be well on your way to discovering how stain concrete floor techniques can elevate your space into something extraordinary!
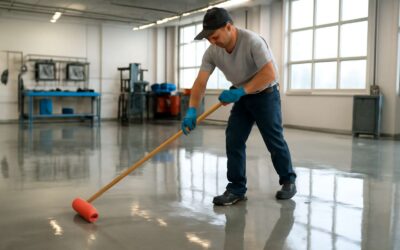
Applying the Stain – Techniques for even application and achieving desired patterns
Applying stain to a concrete floor is a delicate dance between precision and artistry, where the goal is to achieve an even, captivating finish that accentuates the inherent beauty of the material. The process begins with a steady hand and a clear understanding of the techniques required for how stain concrete floor effectively. A common misconception is that stain application is merely about pouring or spraying; in reality, it demands a nuanced approach that considers the texture, porosity, and existing surface conditions of the concrete.
Start by choosing your application method—whether that’s a sprayer for broad coverage or a brush for detailed patterns. For larger expanses, a pump sprayer offers a smooth, even coat, but always work in overlapping passes to prevent streaks. When using a brush, employ long, consistent strokes, ensuring the stain penetrates uniformly. For achieving desired patterns, consider layering colours or employing stencilling techniques, which can add depth and personality to your design. Patience and meticulous attention to detail are essential—each stroke influences the overall aesthetic and longevity of your stained concrete floor.
Multiple Coats and Color Depth – When and how to add additional layers
Staining a concrete floor is an artful process that transforms a dull, utilitarian surface into a captivating focal point. Achieving the perfect depth of colour often involves multiple coats, each adding richness and dimension to the surface. The key lies in understanding when and how to add these layers to maximise durability and visual appeal.
Once the initial coat has dried completely—usually after 4 to 6 hours—inspect the surface for uneven areas or lighter patches. If the colour appears too translucent or lacks vibrancy, a second layer can deepen the hue and enhance the overall effect. When applying additional coats, ensure the surface is clean and free of dust or debris to promote optimal adhesion.
Timing is critical; wait until the first layer is thoroughly dry before proceeding. Lightly abrade the surface with a fine-grit pad if necessary, to improve penetration. For a more complex, variegated look, consider layering different colours or shades, allowing each coat to dry fully before applying the next. This step-by-step process—how stain concrete floor with multiple coats—creates a stunning finish that combines depth, personality, and longevity.
Sealing the Stained Surface – Importance of sealers for protection and finish
Sealing a stained concrete floor is the final chapter in transforming a plain slab into a masterpiece of durability and style. The sealer acts as a protective barrier, locking in the vibrant colours and intricate patterns achieved through the staining process. Without it, the surface becomes vulnerable to staining, wear, and fading—shortening its lifespan dramatically.
Applying the sealer requires precision and patience. Begin by ensuring the stained surface is completely dry—usually waiting at least 24 hours after staining. Next, choose between a penetrating sealer for protection from within or a topical sealer for a glossy finish. Using a high-quality roller or sprayer, apply the sealer evenly, avoiding drips and pooling. Multiple thin coats often outperform a single thick layer, ensuring full coverage and enhanced durability.
Remember, the right sealer not only protects but also enhances the visual impact of the stain. It’s an essential step in how stain concrete floor projects achieve longevity and resistance to daily wear. By sealing properly, you preserve the depth of colour and intricate effects, making your concrete floor a stunning, enduring feature. This step truly elevates the entire staining process from simple transformation to lasting art.
Tips and Best Practices for Staining Concrete Floor
Timing and Weather Conditions – Ideal conditions for staining project
Timing and weather conditions are the silent maestros guiding the symphony of a successful concrete staining project. A concrete surface, much like a canvas awaiting the artist’s touch, responds profoundly to its environment. The ideal moment to how stain concrete floor is during temperate seasons when the air is neither too humid nor too dry—these conditions ensure the stain’s pigments settle evenly and resist premature fading. Moisture, an unwelcome guest, can sabotage the process; thus, selecting a window of dry weather becomes paramount.
Sunlight, often a double-edged sword, can accelerate drying times but also cause uneven absorption if the surface is exposed for too long. To avoid this, plan your project when overcast skies lend a gentle diffusion of light. Wind, too, can carry away moisture and disturb the delicate balance of the staining process.
- Choose days with mild temperatures (between 10°C and 25°C).
- Avoid forecasted rain or high humidity levels.
- Allow sufficient curing time after pouring the concrete before staining.
Patience and precision in timing elevate the artistry of staining a concrete floor. When the weather aligns with these ideal conditions, the stain’s vibrant hues and translucent effects will truly shine, transforming ordinary concrete into a masterpiece of colour and character.
Troubleshooting Common Issues – Fixing uneven coloring, blotchy spots, and streaks
Achieving a flawless finish when how stain concrete floor can be surprisingly challenging, especially when common issues like uneven colouring, blotchy spots, or streaks appear. These imperfections often stem from inconsistent surface preparation or uneven stain application. Fortunately, a few troubleshooting tips can help restore your concrete’s vibrancy and evenness. First, always inspect your surface thoroughly before applying the stain; any residual moisture or surface contaminants can cause uneven absorption, leading to blotchiness. If streaks or patches develop, it’s wise to lightly sand or re-etch the affected areas, ensuring better adhesion and pigment distribution.
For stubborn uneven colouring, applying a second, thin coat of stain after the initial layer has dried can deepen and unify the colour. When working on large surfaces, using a pump sprayer or brush in overlapping strokes helps maintain consistency and prevents streaks. Remember, patience is key—rushing the process often results in patchy results. If persistent issues arise, consider using a neutralising solution to even out the stain or consult professional advice to achieve a seamless, professional finish. Mastering these techniques turns the challenge of how stain concrete floor into an opportunity for artistic expression and durable beauty.
Curing Time and Final Touches – Best practices for drying and maintenance
Achieving a flawless finish when how stain concrete floor can be a game-changer for your space. Once the staining process is complete, proper curing and final touches are essential for lasting beauty. Concrete needs adequate drying time; typically, it takes 24 to 48 hours for the stain to set enough for light foot traffic. During this period, avoid any contact that could disturb the surface or cause uneven absorption. After the initial drying phase, a light cleaning with a damp cloth can help remove any residual dust or uneven patches, ensuring the stain’s vibrancy remains intact.
Sealing is the last step—protecting your stained concrete is vital for durability. Use a high-quality sealer suited for stained concrete floors. It not only enhances colour depth but also shields against stains, moisture, and wear. Remember, applying the sealer in optimal weather conditions—mild temperatures with low humidity—ensures even coverage and maximum adhesion. Regular maintenance, like gentle sweeping and occasional damp mopping, keeps your stained concrete floor looking fresh for years to come.
Maintenance and Cleaning – Keeping your stained concrete looking new
Maintaining the vibrancy and integrity of a stained concrete floor requires more than just initial application; it demands consistent care rooted in understanding the material’s unique properties. Concrete, as a living surface, responds dynamically to its environment, so knowing how stain concrete floor can be preserved over time is essential for lasting beauty. Regular cleaning routines, combined with attention to environmental factors, help ensure your stained surface remains striking and durable.
One of the key considerations is avoiding abrasive cleaning methods that can dull the stain or damage the surface. Instead, opt for gentle sweeping followed by damp mopping with pH-neutral cleaners. For deeper stains or stubborn dirt, using a soft scrub brush can help lift debris without harming the finish. Additionally, applying a fresh coat of sealer periodically enhances the depth of colour while providing a formidable barrier against stains and moisture ingress. Sealer reapplication is especially crucial in high-traffic areas, where wear can diminish the visual impact of your stained concrete floor.
To keep your stained concrete looking as vibrant as the day it was finished, consider these best practices:
- Use mats or rugs in entryways to minimise dirt and grit, which can scratch the surface.
- Avoid harsh chemicals—stick to products specifically formulated for sealed concrete surfaces.
- Perform routine inspections for signs of wear or damage, ensuring repairs are made promptly to prevent further deterioration.
By adopting these simple yet effective maintenance habits, you can extend the lifespan of your stained concrete floor and preserve its aesthetic appeal for years to come. Remember, how stain concrete floor is cared for directly influences its ability to withstand the test of time, weather, and foot traffic—making thoughtful upkeep an investment in lasting beauty.


0 Comments