Planning Your Shed Floor Project
Evaluating the Site and Soil Conditions
South African soil is rarely predictable. The expansive clay in Gauteng swells when wet, while the sandy coastal grounds drain too freely. Before any concrete floor for shed takes shape, the ground beneath it demands honest evaluation. I have seen sites that look perfect in August become swampy basins by November. A week of heavy rain can transform a solid-looking plot into a spongy hazard, and what appears level may hide serious drainage problems.
The slope of the land and the depth of the water table both matter. These factors deserve consideration when assessing the site:
- Type of vegetation and root systems nearby
- Previous disturbances such as backfill or buried rubble
- Seasonal water flow patterns across the property
Each element shifts how the soil reacts through the year, altering the performance of a concrete floor for shed structures in ways that surface-level inspection misses.
Determining Shed Size and Load Requirements
Before any concrete floor for shed is ordered, the purpose of that space deserves honest thought. I have poured floors that were too small within a year, and floors that stretched budgets to their limit. The size of the shed follows the list of what you intend to keep inside:
– A ride-on mower and fuel storage
– Tool chests and a workbench
– Bicycles, ladders, and seasonal gear
Each item carries weight, and weight determines the concrete floor for shed thickness. A simple storage shed handles a 100mm slab. A workshop housing a lathe or a vehicle needs reinforcement and a thicker pour. My own shed grew by two metres once I laid every machine on the grass. Measure generously. The cost of extra concrete is far less than the regret of a cramped floor.
Checking Local Building Codes
In South Africa, a shed floor can quietly trigger a visit from municipal officials if you skip the paperwork. I learned this while helping a neighbour near Durban; his unapproved slab sat for two years before the compliance notice arrived. That concrete floor for shed projects starts with a trip to your local municipality, not the hardware store.
Building regulations in this country exist to keep you, your family, and your neighbours safe. The National Building Regulations specify when a shed below a certain size can skip approval, but those exemptions have limits. Plot coverage, stormwater drainage, and proximity to property boundaries all come into play. A quick phone call to your municipal planning department can save weeks of frustration.
Once the municipality signs off, a permit application typically needs:
– Site plan showing the shed location
– Foundation details and reinforcement specifications
– Engineer’s sign-off for larger spans
Each document tells the municipal reviewer exactly how that concrete floor for shed will behave under load and weather. Approval might take a few weeks, a detail that shapes your project calendar from the outset.
Selecting Materials and Concrete Mix
Choosing the Right Concrete Strength and Slump
A concrete floor for shed projects across South Africa fails most often for one reason: the mix. Too much water turns a sturdy slab into a dusty travesty. For a standard shed, a 25 MPa mix with a 75 mm slump will not let you down. Need to park a bakkie or store machinery? Bump the strength to 30 MPa. Slump is your workability gauge, not a water licence. Keep the water low, and specify a 19 mm aggregate for decent handling. When selecting materials, ask about sulphate-resistant cement, especially for Gauteng’s aggressive soils. Bagged concrete works for a tiny garden shed, but a ready-mix supplier offers better consistency for larger floors. A concrete floor for shed owners who match the spec to the load will quietly outlast every other structure on the property.
Comparing Ready-Mix and Bagged Concrete Options
I have watched too many shed slabs crumble because someone trusted a bagged mix without checking the aggregate. The key difference starts with materials. A concrete floor for shed built from bagged product works only when your water supply and mixing procedure stay disciplined. Ready-mix, by contrast, arrives with a known slump and a batch certificate. You pay for the truck, but you gain consistency that bags cannot match.
Bagged concrete seems cheaper on the shelf. Once you count the extra bags, the time spent mixing, and the risk of a weak patch, the savings shrink fast. Ready-mix remains the superior choice for floors beyond a few square metres, especially where aggressive soils call for sulphate-resistant cement. Ordering a half load might seem wasteful, yet it beats hauling forty bags from the hardware store, mixing each batch by hand, and hoping the water ratio stays constant.
- Bagged: convenient for repairs and tiny structures
- Ready-mix: reliable for a concrete floor for shed exceeding twenty square metres
Incorporating Reinforcement for Longevity
As any seasoned builder will tell you, the true character of a floor reveals itself in the materials you choose. A concrete floor for shed construction demands more than just grabbing the first bag of cement on sale. The aggregate is the skeleton of your slab, and the water is the lifeblood. Skimp on the quality of your sand or use dirty water, and you will nurse a dusty, cracking surface for years. It is a social faux pas of the highest order to blame the concrete when the real culprit was a corner cut during the material selection.
The mix design itself is where longevity is won or lost. For a floor that will bear the weight of a vehicle or heavy machinery, you need a mix with a low water-to-cement ratio. This creates a denser, less porous surface that resists the insidious creep of moisture. Furthermore, the inclusion of steel reinforcement transforms a brittle slab into a resilient one. Properly placed rebar or mesh, lifted off the ground on small chairs, holds the concrete together when the earth beneath it shifts and settles. Consider the following checks before you pour:
– Verify the rebar is at the correct height, not lying flat on the base.
– Overlap your mesh sheets by at least 40 centimetres to ensure a continuous bond.
– Use bar chairs to maintain a consistent cover of 50 millimetres from the soil.
These details are not merely technical; they are the difference between a genteel patio and a functional workshop. The process of curing also plays a pivotal role in this narrative. A concrete floor for shed that is allowed to dry too quickly will shrink and crack as the surface loses moisture at a faster rate than the interior. Keeping the slab damp for at least seven days under a plastic sheet or with regular misting allows the chemical reaction to complete, forging a surface with superior wear resistance. In the South African climate, where the sun can be unforgiving, this step is particularly vital. In the end, a little patience during the curing phase yields a floor that remains resolute, sparing you from the awkward necessity of explaining unsightly cracks to a disapproving spouse.
Adding Moisture Barriers and Vapor Retarders
Selecting materials for a concrete floor for shed starts with honest aggregates. Dirty sand or stone with clay content invites trouble, as that clay pulls moisture from the ground and weakens the slab. Use potable water for mixing. Borehole water may carry salts that react with cement and compromise the surface.
The mix needs a plasticiser to stay workable without extra water. Low water content means a denser slab. But even a perfect mix fails without a vapour barrier. Lay 250 micron polyethylene sheeting over a compacted sand bed, then tape all seams. This keeps rising damp from ruining your stored equipment.
- Overlap barrier sheets by at least 200 mm.
- Fold the sheeting up along the edges to create a sealed tray.
- Pour the concrete soon after laying the barrier to avoid punctures.
That barrier completes a concrete floor for shed construction, stopping the silent creep of groundwater before it becomes your problem.
Planning for Control Joints and Edging
Control joints and edging demand planning during mix design. The choice of cement type shifts the setting time, which dictates when joints can be cut. A concrete floor for shed using rapid-hardening cement requires a different joint schedule than one using ordinary Portland cement.
Formwork material shapes the edge profile. Steel forms give a sharp, uniform line. Timber forms leave a subtler texture but demand careful preparation. The form release agent must suit the form material. I always test the release on a scrap board first.
- Fibre cement strips for formed joints
- Plastic joint profiles for curved edges
- Precast edging for decorative borders
Each decision compounds. Mix design, joint layout, and edge profile determine how the concrete floor for shed performs over decades.
Preparing the Ground and Formwork
Excavating and Leveling the Foundation Area
The ground rarely offers a perfect plane, and a concrete floor for shed will betray high and low spots within its first few seasons. Excavation starts with removing topsoil and organic matter down to undisturbed subsoil. The cut must extend 150 mm beyond the shed footprint to leave room for formwork and working space.
Leveling requires a reference point. I prefer a laser level set on a tripod, then wooden stakes driven at every corner and midpoint. Cut the high areas, fill the low ones with compacted fill, and verify each spot against the same plane.
- Compact the subgrade with a hand tamper or vibrating plate.
- Recheck the slope; water must drain away from the shed.
- Set up formwork boards so their tops align perfectly.
The formwork becomes the mold that gives the slab its straight edges. Align the boards level and brace them against stakes driven deep. This step directly protects the concrete floor for shed from uneven future settlement.
Installing a Compacted Gravel Subbase
With the formwork braced and true, the subgrade waits for its final preparation. A concrete floor for shed should never rest directly on soil. Moisture and movement will find their way up through any weakness. The subbase changes that.
I specify crusher run gravel, stone with fines that bind it into a dense mass. Spread each lift no thicker than 100 mm. Compact with a vibrating plate, crossing each pass twice, once in line, once diagonal. The loose gravel settles more than most expect. Check the leveled surface against the formwork tops with a straightedge. Add gravel where it sinks, scrape away where it builds, and compact again.
The result feels firm underfoot, like a road base. That firmness carries the weight of the slab. For a concrete floor for shed to endure, this compacted bed must be done properly.
Building Square and Level Forms
Once the gravel subbase is locked and level, the ground work turns to the forms themselves. For the concrete floor for shed to emerge true, the forms must become the finished edge the slab will trust.
Check the forms with a taut string line across the tops. Look for dips and crowns. The soil beside the forms should tamp down firmly, so the boards do not rock under the weight of fresh concrete.
To build square and level forms, work in this order:
1. Set the corner stakes first, using a builder’s square for the initial corners.
2. Pull diagonal measurements from opposite corners until both readings match.
3. Screed across the tops of the boards to confirm one continuous level plane.
When the forms are square and level, the concrete floor for shed can be poured with confidence. The frame holds every edge, and the slab will set as one unyielding surface.
Placing Insulation and Vapor Barrier Layers
With the forms braced and true, the ground inside demands a final check. Soft spots from the initial dig will eventually settle under load, leading to cracks in the surface. A hand tamper works well along the edges and near the stakes, where shifting is most likely. This step ensures the base is stable enough to support the full weight of the concrete floor for shed.
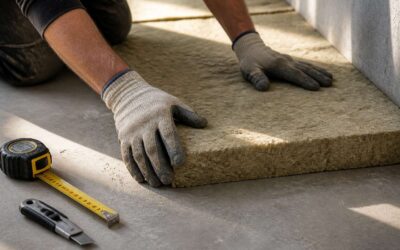
Next come the insulation and vapor barrier layers. A 250 micron polyethylene sheet spreads across the gravel, blocking moisture that would otherwise rise through the slab. Rigid insulation boards, cut to fit tightly between the forms, sit above this membrane. In South Africa’s varied climate, this combination keeps the concrete floor for shed warmer in winter and cooler in summer.
When placing these layers:
- Overlap all polyethylene seams by at least 150mm
- Tape the joints with a high-tack, moisture-resistant tape
- Fold the barrier up the sides of the forms
This creates a continuous envelope that locks out dampness and reduces heat loss.
Pouring and Finishing the Slab
Mixing and Pouring Concrete Effectively
Mixing concrete for your shed floor is a race against the hydration clock. Once water hits the dry ingredients, the chemical reaction starts immediately. I prefer a mechanical mixer for any slab beyond a metre wide, as hand mixing often leads to uneven slump. The goal is a homogenous mass, wet enough to drop from a shovel but stiff enough to hold a footprint. Add water gradually, because overdiluting the mix is the fastest way to weaken the entire slab.
Pouring demands strategy, not brute force. Start at the far corner and work backward toward your access point, dumping each load directly against the previous one. This prevents cold joints, which are invisible fractures in the making. Toss concrete into the forms with a shovel, paying special attention to the edges and corners where voids love to hide. A long-handled vibrator is worth the rental fee, as it settles the mix into every crevice without pushing the reinforcement out of place.
For most shed floors, I follow a simple order:
– Mix a full batch and pour within 15 minutes.
– Strike off the surface with a straight 2×4, sawing it back and forth.
– Bull float immediately to press down the aggregate.
– Wait for the sheen to disappear before edging.
This sequence turns a watery pile into a dense, durable surface. Your concrete floor for shed will only be as sound as the moment you pour it, so commit to the process without second-guessing.
Screeding for a Flat and Even Surface
A concrete floor for shed that varies by more than six millimetres across a two metre span will fight every shelf and cabinet you install. Screeding is the first chance to correct that.
Screeding means dragging a straight 2×4 across the freshly poured surface using the forms as rails. Saw the board back and forth while pulling it toward you. This forward and lateral motion moves excess concrete forward while filling low spots. Do not lift the screed off the forms. Keep it in contact the entire pass!
Watch for these issues as you go:
– Aggregate bridging, where stones pile up in front of the board.
– Low corners that need extra concrete shoveled in before the next pass.
– High spots that leave the board tilted and skipping.
After two passes, check the surface with an aluminium straightedge. Place it on the slab and look for daylight underneath. That gap shows where the concrete floor for shed needs more attention. Fill low points with a shovel of mix and screed again.
Troweling and Floating Techniques
The concrete floor for shed does not forgive hesitation. Once the screed pass is complete, the surface begins its quiet transformation, losing moisture and firming up with a stubbornness that demands respect. Timing becomes the entire game. Wait too long, and the mix stiffens beyond repair. Move too soon, and the finish will peel and dust. You are working against the clock, and the clock never blinks.
Floating is the first act of persuasion. Using a magnesium float, work the surface in broad, sweeping arcs. This closes the pores left by the screed and pushes the finer particles upward. You are not polishing. You are consolidating. Watch for the bleed water to disappear before you start. If you float while the surface is still wet, you trap moisture and create a weak, chalky layer. The concrete floor for shed needs to breathe.
– Check the surface for low spots that have not yet closed.
– Feel for a gritty texture that indicates the mix is still too wet.
– Look for the sheen to dull before applying more pressure.
Troweling comes after the float has done its work. Steel trowels press the surface harder, creating that dense, smooth finish that resists dusting and wear. Do not rush this stage. The concrete floor for shed must be firm enough to hold your weight without leaving deep impressions. Work in small circles, overlapping each pass. The pressure you apply matters more than the speed. Each stroke compresses the surface further, building a skin that will bear the weight of tools, machinery, and foot traffic for decades. The finish is a conversation between your hand and the setting concrete, and the concrete always answers last.
Creating a Broom Finish for Slip Resistance
Pouring and finishing the slab takes a deliberate turn when you opt for a broom finish. Slip resistance on a concrete floor for shed is not a luxury; it is a safety measure. After troweling, wait for the surface to stiffen. Press your thumb into the concrete. If it leaves a clean indentation, you are ready. Drag a stiff bristle broom across the slab in a straight line, lifting it at the end of each stroke. Overlap each pass by half the broom width. I have ruined a slab by waiting too long!
Check for these issues as you work:
- A soft broom will not create enough texture.
- A hard broom will tear the surface.
- Working in circles traps water.
A consistent hand pressure produces a concrete floor for shed that sheds water and keeps footing reliable.
Curing and Drying Considerations
Concrete hardens for weeks after the trowel stops moving. A slab gains half its design strength within seven days, driven entirely by moisture. When hydration stalls, a concrete floor for shed suffers visibly. The best broom finish in Pretoria cannot rescue a floor dried too fast.
Concrete curing mistakes remain easy to make:
- Leaving the slab exposed to wind and direct sun without coverage
- Walking on green concrete while it still looks wet
- Removing the timber forms before the edges harden properly
I have watched owners forget that drying and curing are different phases. For a concrete floor for shed, moisture retention comes from polyethylene sheeting or damp hessian. South African highveld conditions dry surfaces fast! As the slab dries, surface moisture evaporates at its own pace. A common field test uses a rubber mat left on the floor overnight. If condensation appears underneath, moisture persists, and coatings should wait.
Cutting Control Joints to Prevent Cracking
Pouring and finishing the slab flows into one critical decision: where the concrete will crack. Every concrete floor for shed will crack. The goal is to make those cracks occur where you want them, not where nature decides.
Control joints create a weakened plane. Cut them after the surface has hardened enough to resist a trowel’s edge but before the concrete becomes too hard for the saw. A timing window of six to twelve hours works in most Highveld conditions.
- Cut joints one quarter to one third of the slab thickness deep
- Space them no more than two to three metres apart
- Keep panels square rather than long and rectangular
The saw should run straight, guided by a chalk line. A concrete floor for shed that skips this step trades a single clean hairline for a jagged network.
Protecting and Maintaining the Floor
Sealing and Coating Options
Once the concrete floor for shed has cured and the control joints are cut, the surface remains vulnerable to oil stains, moisture intrusion, and dusting. Sealing is not optional if you want longevity. A penetrating sealer works from within, while a film-forming sealer sits on top. For workshops, epoxy coatings offer superior resistance to chemicals and abrasion. Polyurethane and acrylic options provide different levels of gloss and durability. Consider the following when choosing:
- Penetrating sealers for breathability and a natural look
- Epoxy for heavy-duty protection against oil and solvents
- Acrylic coatings for cost-effective UV resistance
Each product has trade-offs. A concrete floor for shed that sees vehicle traffic demands a tougher film. Reapplication schedules vary, so check manufacturer guidelines. The right coating transforms maintenance from a chore into a simple wipe-down.
Routine Cleaning and Care
A concrete floor for shed surfaces asks for simple rituals, not elaborate ones. Sweep regularly to remove the abrasive grit carried in on boots and tyres. Left to linger, that grit grinds away at the sealer.
For deeper cleaning, use a pH-neutral soap mixed with warm water. Harsh chemicals strip the protective layer and leave a dull haze. Mop the surface and let it dry before parking anything on it. I have seen floors ruined by a single bleached bucket.
- Wipe oil spills while they are fresh, since dried stains bond hard
- Rinse the mop often so you are not spreading dirt
- Place a mat at the door to catch the worst of the dust
This routine keeps a concrete floor for shed looking honest and solid, ready for another season of work.
Repairing Cracks and Spalling
A concrete floor for shed develops cracks and spalling over time. These are not cosmetic failures. They are structural warnings. Cracks open pathways for moisture, while spalling indicates the surface is losing its bond. I have seen floors where a single hairline crack turned into a pothole within two winters.
Repair requires honest assessment. Loose material must be removed entirely. The edges of a spalled area often hide deeper weakness. Grinding back to sound concrete is the only reliable approach. For cracks, widening the base into an inverted V allows patching compound to anchor properly.
- Wide cracks need flexible filler to accommodate movement
- Spalled patches require bonding agents before resurfacing
- Deep damage may demand full-depth repair rather than surface patching
Left untreated, these defects invite weeds, water ingress, and further deterioration. A properly repaired concrete floor for shed can outlast the building itself. But every repair is only as good as the preparation beneath it.



0 Comments