Understanding the Challenge
Common Causes of Uneven Concrete Floors
A concrete floor rarely fails without reason. In South Africa, shifting clay soils and extreme temperature swings are frequent culprits, leaving slabs cracked and uneven. Poor subgrade preparation also plays a role, as does water damage that erodes the base over time.
- Expansive clay soil that swells and contracts
- Inadequate compaction before pouring
- Tree roots pushing up from below
- Leaking pipes washing out support
Each issue changes the slab’s geometry, making movement feel inevitable. But understanding the cause is the first step! That knowledge guides every choice among flooring solutions for uneven concrete floor, from self levelling compounds to floating systems. I’ve seen too many repairs fail because the root problem went unaddressed.
Why Leveling Matters for Flooring Installation
Consider this: a deviation of only three millimetres over one metre can cause tile lips, hollow sounds, and premature wear. In South Africa, where expansive soils constantly shift, this challenge appears on many residential slabs.
Leveling matters because every flooring material depends on a stable base. Vinyl sheets reveal every bump. Floating laminates move and separate. Tiles crack under uneven support.
- Every millimetre of difference changes adhesive thickness
- Moisture levels influence bond strength
- Slope determines how well the surface drains
This groundwork determines which flooring solutions for uneven concrete floor will work without compromise. I have watched a simple self leveling pour turn a hopeless slab into a reliable surface. Precision at this stage prevents costly rework.
Risks of Ignoring Unevenness
The hidden costs of an uneven slab surface reveal themselves only after installation. A floating floor may feel stable for weeks, then begins to creak along the ridges. Grout lines crack in straight patterns that trace the voids below. Each symptom points back to a subfloor that was never corrected.
Ignoring the problem creates a cascade of failures:
1. Adhesive failure where the slab dips
2. Stress fractures where the slab peaks
3. Moisture entrapment in low-lying areas
4. Progressive loosening of the entire floor system
Every repair triggers another. A single cracked tile spreads to its neighbours. The longer you wait, the more extensive the damage becomes. What starts as a visible blemish turns into structural compromise that reaches into the underlayment. Addressing the source early remains the most economical path, and the right flooring solutions for uneven concrete floor can preserve the entire installation.
Pre-Installation Assessment and Preparation
How to Measure Floor Flatness and Level
Your eyes are unreliable judges of a concrete slab’s true character. A floor may appear perfectly flat, yet a 5 millimetre dip can cause floating floors to flex and tiles to crack. Before you consider any flooring solutions for uneven concrete floor, you must measure what you see.
Flatness refers to surface irregularities, while level describes tilt relative to the horizon. You need both numbers. A 2 metre straightedge will reveal local dips. A laser level will show how much the slab slopes across a room.
- Set the straightedge on the floor and measure the gap beneath it at every point.
- Shoot a laser level from one corner and record the height difference at each wall.
Record these values in a notebook. They will dictate your choice of self leveling compound or adjustable supports. Without this data, you are guessing, and guessing is expensive.
Identifying Cracks and Moisture Issues
Cracks and moisture are the two conditions that sabotage concrete floor jobs. In South Africa, Highveld summers bring thunderstorms and winters bring dry conditions, so concrete develops both problems. A hairline crack may look innocent, but once you pour levelling compound over it, that crack becomes a conduit for moisture.
Before you commit to flooring solutions for uneven concrete floor, check every crack with a screwdriver. If the edges crumble, the concrete is deteriorating. That changes your preparation strategy. I’ve seen contractors skip this step and return three months later to peeling vinyl and popped tiles.
Run these three tests before any product touches the slab!
- Tape a 500mm square plastic sheet to the floor and seal the edges.
- Leave it for 48 hours.
- Check for condensation underneath.
Also look for efflorescence, the white powder signalling moisture moving through the slab. A damp test kit gives you actual numbers. Combine those with your crack assessment before choosing flooring solutions for uneven concrete floor.
Cleaning and Repairing the Concrete Surface
In the Highveld, dry winter air drops a fine layer of dust on your concrete, and that dust will ruin any bond. Old adhesives and oils sabotage your flooring solutions for uneven concrete floor before you even start. Installers often skip a proper clean and watch their self-leveler peel up within the week.
The fix begins with a mechanical scrape or a heavy-duty degreaser. This opens the pores of the slab and strips away any residual film. Once bare, physical damage demands your attention.
- Chip away loose concrete with a chisel.
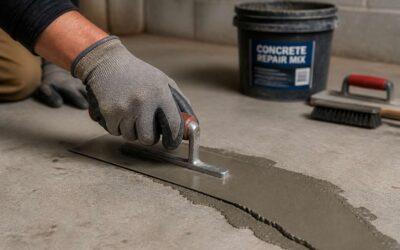
- Apply a polymer-modified filler to deep holes.
- Feather the patch level with the surrounding floor.
These small repairs are vital for any flooring solutions for uneven concrete floor. A proud patch creates a high spot, while a sunken one leaves a void. Both telegraph through your final finish. A clean, structurally sound surface gives your levelling compound the adhesion it needs to hold.
Choosing the Right Leveling Material
Seventy percent of floor failures trace back to preparation. Installers pour expensive self-levelers onto slabs carrying dust, old adhesive and moisture. A simple test battery reveals those hazards before you spend a rand.
Pre-installation demands three numbers: moisture vapor emission, relative humidity and pH. A calcium chloride test gives you the first, a hygrometer the second, a litmus strip the third. In the Highveld, readings swing daily. Measure in the morning and again after lunch. A slab below 3 pounds per 1000 square feet passes.
- Feather finishes suit shallow spots up to 5 mm.
- Flowing self-levelers handle depths between 3 mm and 50 mm.
- Fiber-reinforced blends tolerate hairline cracks.
Choosing the wrong material for flooring solutions for uneven concrete floor wastes money twice. A gypsum-based pour dries fast but fails under moisture. A cementitious compound handles humidity. Match chemistry to the room’s climate.
Self-Leveling Compounds and Overlayments
Steps to Apply Self-Leveling Compound
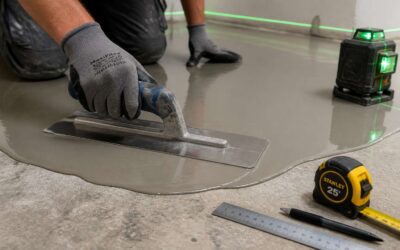
I have seen beautiful floors fail because someone skipped the leveling pass. Yet reliable flooring solutions for uneven concrete floor begin with a smooth substrate. Self-leveling compound rewards a careful hand. Mix it to the manufacturer’s exact water ratio, then pour it onto the slab in a continuous ribbon. Work in small areas, no larger than a few square metres, because the compound thickens within twenty minutes.
- Mix to a pourable batter.
- Pour onto low spots and let it flow.
- Run a spiked roller to release trapped air.
After pouring, do not trowel or smooth. The compound levels itself! This sequence is one of the most reliable flooring solutions for uneven concrete floor, and you can walk on it within hours. A straightedge check tells you if a second, thinner pass is needed. Most spaces need one application of eight to ten millimetres, though deeper craters require a second pour.
Drying and Curing Times
A two hour dry time on the bag is only the beginning. Self-leveling compounds and overlayments undergo two processes. Drying is the escape of water. Curing is the latent hydration that builds a crystalline lattice, central to flooring solutions for uneven concrete floor. This chemical reaction continues for weeks, after you step on it!
Forcing a schedule traps moisture vapor against your final floor covering. Variables control this timeline:
- Ambient temperature and relative humidity
- Depth of the pour, as thicker sections retain heat
- Surface porosity of the original concrete
In Johannesburg’s winter, ten millimeter pour cures in three days. Coastal Cape Town adds twelve hours. Patience is requirement. Reliable flooring solutions for uneven concrete floor depend on respecting the difference between dry and hard. Walking too soon schedules a future repair. That is why you verify moisture vapor transmission before installation. Waiting period decides whether your investment holds or delaminates.
Alternatives to Self-Leveling Overlays
A builder once said that no slab is truly level. Self-leveling compounds are a common remedy, yet they are not a universal mandate. A concrete floor with isolated sags yields to a vinyl patching compound troweled into the hollows. For high ridges, a grinder can plane the surface down, though it raises dust and requires a skilled hand. A floating floor assembly with a closed-cell underlayment offers a third route, bridging moderate deviations without a liquid pour. Consider these alternatives:
- Use patching compound for bowl-shaped depressions shallower than ten millimeters.
- Grind only when the high spots exceed the low spots by a narrow margin.
- Choose an underlayment when the final floor is of a floating type and the slope is gentle.
These alternatives comprise legitimate flooring solutions for uneven concrete floor. Knowing when to patch, grind, or underlay prevents wasted material and preserves the slab’s integrity. The correct choice depends on the shape and extent of the defect, not on the popularity of the method.
Troubleshooting Common Leveling Problems
Among flooring solutions for uneven concrete floor, self-leveling compounds require discipline, and discipline often breaks. A batch mixed too stiffly will ripple across the surface, while an overly wet slurry may segregate, leaving a weak film on top. These defects appear as hollow sounds or hairline cracks, and they demand immediate action before the next layer.
For those diagnosing their own pour, a few checks matter most:
- Test the surface with a straightedge after 24 hours, not the touch of a finger.
- Look for blisters that indicate trapped air, often from a roller used too aggressively.
- Confirm the room temperature stayed within the product’s specified range for the full cure.
I have watched a skilled installer save a flawed pour by grinding only the offending ridges and then applying a thin skim coat. That pragmatic repair stands among the most honest flooring solutions for uneven concrete floor, because it works with the material’s behavior rather than against it. The key is catching the problem while the compound is still green, before it hardens into a permanent flaw.
Flooring Options for Uneven Concrete
Engineered Wood and Laminate with Underlayment
Engineered wood and laminate with underlayment are solid flooring solutions for uneven concrete floor when the surface differs by only a few millimetres. Because these planks float, the underlayment takes up the slack. A dense foam or cork layer smooths over tiny hollows without transferring them to your feet.
I always check the vapour barrier on the underlayment, especially for slabs in coastal regions. The difference between a cheap and a premium product often shows in this layer. Thicker underlayments hide more, but they compress over time.
Before you buy, compare these numbers:
- Maximum floor flatness tolerance
- Compression set percentage
- Thermal resistance value
Luxury Vinyl Plank and Tile Solutions
South Africa’s clay soils and coastal humidity mean concrete slabs rarely stay perfectly level. Luxury vinyl plank and tile offer dependable flooring solutions for uneven concrete floor when you prepare correctly. LVP floats over minor dips, and a quality plank with an attached pad absorbs undulations up to 3mm without transferring them to your feet. Tile needs a decoupling membrane. This separates tile from slab movement. For both options, consider:
- Plank thickness and wear layer
- Attached underlayment density
- Manufacturer flatness tolerance rating
A rigid core plank handles worse surfaces than flexible options. The locking system must stay tight, since vertical movement weakens the joint over time. In coastal regions, I always check the moisture barrier rating first.
Carpet and Carpet Tiles with Padding
Carpet ranks among the most forgiving flooring solutions for uneven concrete floor. Soft flooring absorbs the surface deviations of a sunken slab. In Johannesburg’s temperature swings, concrete shifts by millimeters; a high-density foam underlay absorbs that movement. The cushion hides a 5mm dip that would trip a rigid plank. Carpet tiles, with bitumen backing, need a flexible adhesive to allow slight vertical play without releasing corners.
- A heavy 20-ounce face weight hides subfloor texture.
- A bonded cushion of at least 8mm spans larger voids.
The pile compresses and recovers, so your feet never register the low points. I have seen a dining room where the carpet covered a 15mm depression, and the only evidence was a slight softness underfoot. This is the practical value of textile. It conceals the flaw with a uniform cushion. For flooring solutions for uneven concrete floor, this forgiving character matters more than any leveling compound.
Tile and Stone Installation Considerations
Tile and stone transfer every slab deviation to your feet. A 3mm dip under a 600mm porcelain tile creates visible lippage and a trip hazard. For flooring solutions for uneven concrete floor, tile installers use a medium-bed mortar to absorb minor waves. Deep voids demand a crack isolation membrane before setting begins. Stone complicates this, as natural thickness varies.
- A 12mm notched trowel bridges low spots with medium-bed mortar.
- A decoupling membrane separates tile from slab movement.
- Smaller tiles conform better to surface undulations.
- A straightedge check before adhesive sets prevents lippage.
Mortar cures rigidly, so remaining unevenness becomes permanent. Large granite slabs rock on humps, cracking grout under foot traffic.
Floating Floors vs. Glued-Down Systems
Floating floors offer a measure of forgiveness that glued down systems cannot match. The planks lock together and rest on an underlayment, which absorbs minor slab deviations before they reach your feet. That makes floating floors a practical option among flooring solutions for uneven concrete floor, especially when a perfectly flat substrate is not guaranteed.
Glued down systems demand more from the slab. The adhesive bonds directly to the concrete, so every bump and hollow transfers straight through to the finished surface. This delivers superior stability and a solid feel underfoot, but leaves no room for error.
The trade-offs are clear:
- Floating floors allow natural expansion and contraction across large areas.
- Glued down floors reduce movement but require a flatter base.
- Floating installations can be replaced plank by plank; glued down floors resist moisture from below.
Rubber and Cork Flooring for Comfort
The uneven concrete slab presents a persistent problem in many South African homes. Its hollows and ridges press into your daily rhythm. For those seeking reprieve, rubber and cork offer quiet, forgiving counterpoints. These materials do not fight the base; they absorb its frailties beneath your feet.
Rubber flooring compresses under pressure, masking minor depressions with a resilient, silent spring! It offers grip where polished stone would betray you. Cork, meanwhile, holds a honeycomb of air cells, yielding gently to the slab’s inconsistencies while providing rare thermal comfort.
- Rubber resists moisture and heavy foot traffic.
- Cork offers natural insulation and a soft, muted step.
Both render the blemished concrete irrelevant, transforming a problematic base into a comfortable foundation. Rubber and cork emerge as prime flooring solutions for uneven concrete floor. I have seen them quiet the nagging undulations of old screed, granting rooms a level of comfort that rigid systems simply cannot promise!
Underlayment Systems and Subfloor Preparation
Using Plywood or OSB Underlayment
Beneath every floor lies a story of shifting earth and settling concrete, a narrative written in hairline cracks and subtle slopes. For South African homes where the slab has lost its true plane, flooring solutions for uneven concrete floor often begin with underlayment systems. A layer of 12mm exterior grade plywood or OSB, mechanically fastened or floated over the existing concrete, creates a uniform substrate that accepts whatever finish you choose without complaint.
The choice between plywood and OSB comes down to moisture resistance and dimensional stability. When the concrete reads dry and the coastal air carries humidity, plywood holds its shape better. OSB performs admirably where budget outranks longevity.
- Check for moisture before laying any wood based underlayment
- Lay a vapour barrier beneath the panels to stop wicking
- Stagger the seams so no continuous line runs the length of the room
These measures turn a fractured surface into a quiet foundation. The underlayment mediates the imperfections below, giving your flooring a level stage to perform on. Without these preparations, even the finest flooring solutions for uneven concrete floor will betray you with creaks and hollow spots.
Foam and Cork Underlayments
Where panels impose their will, roll underlayments negotiate with it. Foam and cork offer flooring solutions for uneven concrete floor that trade rigidity for resilience. These materials press against the slab, absorbing minor deviations without demanding a level substrate.
Cork, harvested from the bark of the cork oak, presents a cellular structure that compresses and rebounds. It handles the undulations of a weathered screed with patience. Cork brings to a room:
– Acoustic insulation
– Thermal comfort
– Mildew and rot resistance
Elasticity is valuable in coastal properties. Polyethylene foam rolls do the same. For flooring solutions for uneven concrete floor, the closed cell structure resists moisture wicking from the concrete, removing one variable from the preparation equation. The cushioning eases stress on floor joints. These sheets are easier to cut and lay than cork.
The surface beneath either must be clean. Dirt or debris becomes a pressure point, transferring its flaw to the finish. Dampness checks remain essential before rolling out the underlayment.
Moisture Barriers and Vapor Retarders
A concrete slab can look bone dry while water still rises through its pores. Hydrostatic pressure operates independently of surface deviations. For flooring solutions for uneven concrete floor, a vapor retarder is the critical control point before any finish layer goes down.
A true vapor barrier stops moisture below 0.1 perms. A retarder only slows it. On an irregular slab, leveling compound does not stop capillary action. The membrane sits on cleaned concrete, with seams taped and the edge sealed.
Before I roll out a membrane, I check two things:
- No standing water.
- Surface temperature above dew point.
In coastal regions like the Western Cape, this step carries weight. A floating floor with a correctly installed vapor retarder stops interstitial condensation. For anyone weighing flooring solutions for uneven concrete floor, skipping this layer invites warping. It often separates a repair from a redo!
Professional vs. DIY Installation
When to Call a Professional
The DIY approach reads simple on the box. Mix the compound, pour, smooth. The mixture sets faster than your patience empties. One wrong proportion leaves a permanent, lumpy reminder of your ambition.
Professional crews own calibrated tools and a memory of past disasters. They know when a patch will hold and when it will fail. Certain situations should take pride out of the equation:
- An uneven area that stretches beyond a single bedroom
- Cracks that reappear overnight after your repair
- Moisture testing that reveals high readings
- A floor that visibly slopes when you put a spirit level down
Flooring solutions for uneven concrete floor demand a clear head. Your floor does not care about your weekend plans. The choice between your own labour and a hired team is arithmetic, not a character test.
Tools and Equipment Needed for DIY
The gap between a professional crew and a determined DIYer is rarely skill. It is equipment. A self-leveling compound offers roughly twenty minutes of working time. In that window, you mix, pour, spread, and roll the entire batch. Professional crews use twin-paddle mixers and industrial spiked rollers because hesitation is expensive. The mixture does not wait for your schedule. For any flooring solutions for uneven concrete floor, the toolbag matters more than the product.
- A drill with at least 1600 watts of torque
- A mixing paddle rated for heavy compound
- A gauge rake to control pour depth
- A spiked roller to release trapped air
- Spiked shoes for walking on fresh material
That list only covers the hardware. Temperature, slab moisture, and time of day shift the outcome. Many self-leveling jobs fail when the person holding the gauge rake misjudges one variable. The product was never the problem.
Cost Considerations and Budget Planning
What separates a R30,000 quote from a R9,000 weekend of work? The answer is often hidden in the subfloor. Professional crews charge premium rates because they carry the risk of a failed pour. They own the responsibility for moisture readings, ambient temperature, and the precise mixing ratios that determine whether your flooring solutions for uneven concrete floor will survive the first winter.
DIY pricing looks seductive on paper. Then you add the hidden costs:
- Spiked shoe rental
- A second bag of primer after a moisture spike
- Disposal fees for old adhesive
- Professional flattening of a section poured too thin
The gap narrows. A contractor factors in the trips back to the hardware store. For many South African homeowners, paying a professional still beats the cost of doing it twice.
Step-by-Step DIY Process Overview
The physics of a leveling pour is unforgiving. Professional crews listen for air whistling through hairline cracks. The amateur hears only the drill. The true separator is the ritual.
For the homeowner, the step-by-step DIY process is a sequence of measured steps. You yield to the substrate. You obey the ambient temperature. You act only when the moisture meter is silent.
- Check the forecast 48 hours out. Rain alters humidity.
- Stage every bucket and spike shoe before mixing.
- Have a second person ready to hold the paddle.
- Commit to pouring a full bag. Half bags cure too fast, ruining your flooring solutions for uneven concrete floor.
Professional crews accept the raw liability. The determined homeowner accepts the risk of a second attempt. Both can deliver excellent flooring solutions for uneven concrete floor, but only one sleeps through the first thunderstorm!
Common Mistakes to Avoid
Statistically, nearly 40% of DIY self-leveling pours fail on the first attempt. The mistake is rarely the material; it is the sequence. Professionals treat the pour as a single gesture, while the amateur pauses to admire the flow. That pause costs thirty seconds. The compound sets while you admire it.
Common errors separate the two camps:
- Guessing moisture content instead of using a hygrometer.
- Pouring thick in one area to compensate for a deep depression.
- Ignoring the spike shoe requirement for the second pass.
Each of these derails flooring solutions for uneven concrete floor. The professional anticipates the chemical reaction; the amateur negotiates with it. Both claim the same goal, but only one carries a warranty.


0 Comments